Where is PHP.ini In WordPress – How To Locate and Edit PHP.ini
WordPress websites require a good degree of customizations and maintenance work. Whether you want to speed up your WordPress site, tighten its security, or just develop a custom feature, you often need to access the files that make up your WordPress installation and edit them directly.
The php.ini is one such important file in your WordPress installation that you’ll often need to edit to improve your site’s functionality and performance.
But where is php.ini in WordPress? This is one such question you’ll find yourself asking when maintaining your WordPress website.
A lot of WordPress tutorials on the internet tell you to edit your php.ini file and add some custom code in there.
And that’s when it gets complicated. If you’ve never done that before or when you don’t have any idea about what a php.ini file does, where it’s located, and how to edit it, following any such tutorial becomes out of the question.
This is one of many situations when many people get frustrated with WordPress and start considering WordPress alternatives for their website.
Here, we’ve compiled this comprehensive guide for you that will help you locate the php.ini file in WordPress and explain how to edit it along with the most common configurations you’re often required to do.
- What is php.ini and What Does It Do?
- Why Do You Need To Edit php.ini?
- Where is php.ini in WordPress?
- The Most Common Configurations for php.ini
1. What is PHP.INI and What Does It Do?
To follow any WordPress tutorial, it’s absolutely necessary to understand the ins and outs of WordPress, how all the files are structured, and what’s their purpose.
Maintaining your WordPress site becomes a breeze when you understand these technicalities.
So, what is php.ini?
The php.ini file is the default configuration file for PHP. It’s where you change the default settings of PHP and is often loaded to run applications that require PHP.
And since PHP is the core language of WordPress, this is one of the most important files in your WordPress installation.
Whenever PHP is initiated, it looks for the php.ini file to look for any changes in the default functionality of PHP.
2. Why Do You Need To Edit php.ini in WordPress?
Now, let’s come to the next important question before we answer “where is php.ini in WordPress?”
Why do you need to edit php.ini when working with WordPress?
Php.ini has some important settings and configurations related to maximum file size upload, file timeouts, resource limits, and maximum execution time. You may need to change the default settings of these to improve your site’s performance.
You’ll also use this file to enable or disable file extensions in PHP. For example, if you’re getting this error in WordPress that says “Your Php is missing the MySQL extension”, you may need to edit the php.ini file to enable the MySQL extension and configure it properly if other workarounds and solutions don’t work.
And in that case, you’ll need to locate and edit your php.ini file.
3. Where is php.ini in WordPress?
Now, for the most important question of this post: where is php.ini located in WordPress?
The answer, unfortunately, is a bit more complex than you hoped for.
It actually depends on your server environment and your system. Depending on that, there are different ways to access your php.ini file and edit it.
However, there is one simple solution to find the php.ini file that works in every case, regardless of your server, production environment, or local environment.
If for any reason, that method doesn’t work for you, you’ll have to look for the php.ini file based on your system.
- Finding php.ini in WordPress using the phpinfo.php file
- Where is PHP.ini in localhost
- Where is PHP.ini on Live Server
- Where is PHP.ini on Shared Server
Finding php.ini in WordPress using the phpinfo.php file – The Simplest Way To Find The File
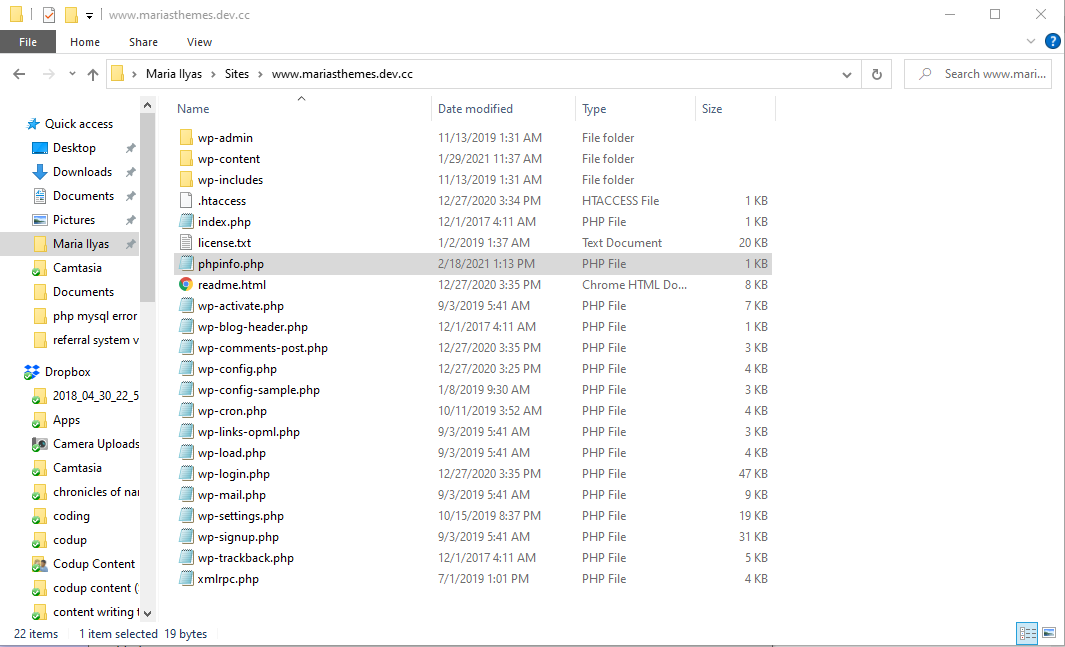
The simplest way to find the location of your php.ini file is to create a phpinfo.php file and place it in the root directory of your WordPress installation.
How do you do it exactly? Let me explain step-by-step.
Step 1: Open a text editor like Notepad, Brackets, etc and add the following code in it:
<?php phpinfo(); ?>
Rename the file to phpinfo.php. The filename doesn’t matter. What matters is that it should end with .php and should have the code mentioned above in it.
Step 2: Place the file in your root directory. If you’re in a local environment, you can simply copy-paste the file.
If you’re in a live environment, on the other hand, you’ll need to use the File Manager app of your cPanel to upload the file in your root directory or use an FTP client to upload it.
Step 3: Open the file in your browser by typing in your website address in the address bar followed by the file name. So, it should look like this:
www.yourwebsitedomain.com/phpinfo.php
Doing so opens a page that displays information about your PHP installation. You can find all information from this page including the file path of the PHP.ini file.
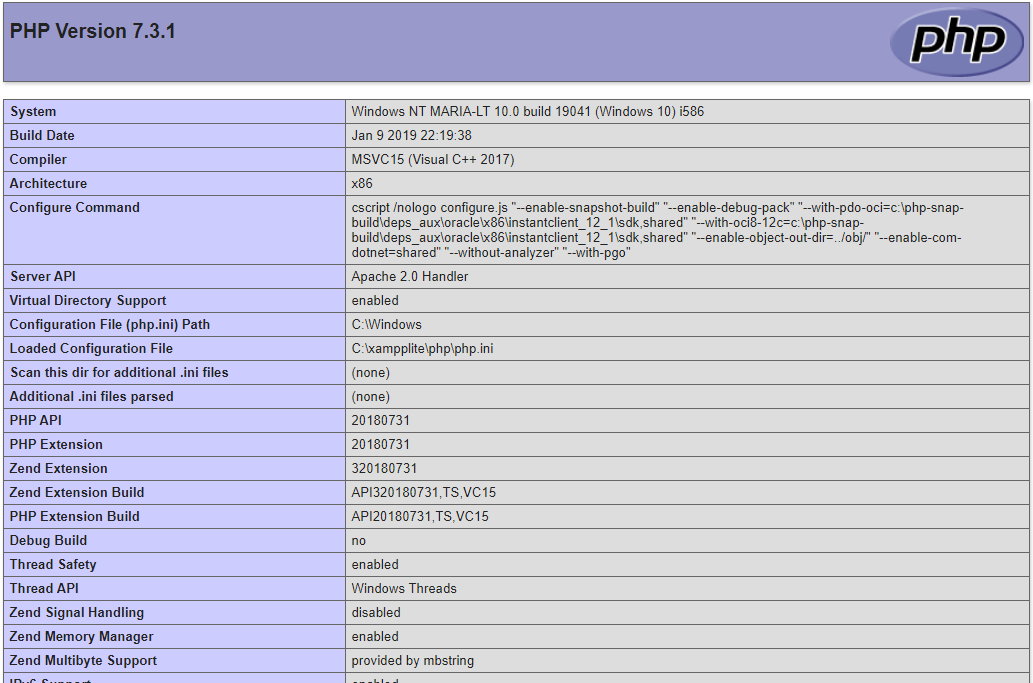
To find the file path of PHP.ini file, look for the field titled Configuration File Path or Loaded Configuration File. The file path of php.ini should be listed in one of these.
Where is PHP.ini in localhost
If for some reason, the above method doesn’t work for you, you’ll have to find the location of the php.ini file using other methods. If you’re in a local environment, the location of the php.ini file depends on the software you’re using.
Here, we’ve listed two of the most popular programs used for local WordPress installation.
Where is PHP.ini in WAMP
If you’re using WAMP for your local WordPress installation, you can easily find the location of php.ini by right-clicking on the program icon and navigating to PHP > php.ini.
That’s it. It’s very easy to find php.ini in WAMP.
Where is PHP.ini in XXAMP
If you’re using XXAMP, it’s a bit tricky to find the php.ini file there. Open the XXAMP program and click on Config next to the Apache Module. And there, you’ll find the php.ini option in the menu that pops up.
Where is PHP.ini in Linux
If you’re on Linux, find the php.ini file by typing the code below in the terminal:
php -i | grep “Loaded Configuration File”
You should see an output like this:
Loaded Configuration File => /usr/local/lib/php.ini
If it doesn’t show up, try switching “Loaded Configuration File” with “Configuration File”.
Where is PHP.ini on Live Server
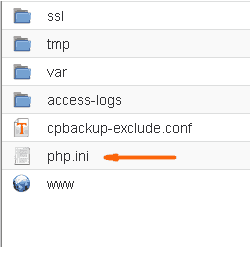
If you’re on a live server, it mostly depends on your hosting service. However, here is where the php.ini file is living in most cases:
From your cPanel, open the File Manager app and open your root directory. It should be one level down your public_html folder. And that’s where you’ll find the little guy.
Where is PHP.ini on Shared Server
If you’re using shared hosting, you can’t edit the php.ini file, unfortunately. There is, however, a workaround to edit PHP functionality.
You’ll need to edit your .htaccess file to be able to customize the default setting of PHP.
Here is how you add the code in .htaccess file:
php_value name value
The name parameter represents the name of the PHP property you want to change while value here represents the value of the property you want to set.
For example, if you want to change the size of maximum file upload, this is the code you would put:
php_value upload_max_filesize 8MB
That’s it! So, now that you’ve hunted down the php.ini file, time to edit it.
4. The Most Common Configurations for php.ini in WordPress
Here are some common configurations WordPress users often change to optimize their site’s performance.
Though there are many commands in the php.ini file, we can’t change all of them. But there are some that we can. Below are those that we can change, what they do, and the code we’ll write to change those.
Max Execution Time
This is the time needed to execute scripts or the time needed by the server to run commands. By default, this value is quite low and if you try to upload big files to the server, it will lead to some kind of error.
To optimize WordPress, change the default configuration and increase the time limit, like so:
max_execution_time = 60
Memory Limit
Memory_limit is the command that limits the memory usage of PHP in WordPress. It relates to the memory needed to upload files and run commands. It should be more than the size of the file you upload.
The recommended value is 128 MB.
Change the configuration in php.ini file to:
memory_limit = 128M
Upload Max File size
When uploading media in WordPress, you often see this file size limit mentioned there. This is how you can increase the limit to fix errors of memory limit exhausted.
upload_max_filesize = 8M
Summary: Where is php.ini in WordPress
For optimum performance of your WordPress site, it’s often required to edit your php.ini file. This post has summarized what a php.ini file is, why there is a need to edit it, how to find it and the most common configurations required to edit it.
Need a professional WordPress developer to take care of cumbersome tasks for you? Click here to discuss the feasibility of WordPress Development Services for your business.
Read Also
- How to Make a Divi Child Theme in Easy, Simple Steps
- How to Edit WordPress Code – HTML, CSS, PHP (Easy Guide)
- How to Get the WordPress Post ID
- How to Set Up a PayPal Donation Button on WordPress
- How To Provide SMS Customer Support?
- How to Fix WordPress Stuck in Maintenance Mode
- How to Embed iFrame Code on Your WordPress Site
- How to Build a Simple Auction Website Using WooCommerce?
- How to Add a Favicon to Your WordPress Website
- How to Fix the WordPress HTTP Error (Uploading Images to Media Library)
- How To Update PHP Version In WordPress