How To Perform Websites Migrations With Migrate Guru

WordPress Migration.
These two words have sent shivers down the spines of many a WordPress webmaster.
The problems associated with migrating a WordPress website are plenty. But all hope is not lost. There is light at the end of the tunnel. For webmasters looking to migrate to another host, Migrate Guru provides a simplified solution to these headaches.

A free WordPress migration plugin, it is by-far the fastest way to migrate your WordPress site. It makes the WordPress migration process entirely automatic, eliminating the need for any manual input.
It automates all the migration tasks, reducing the migration burdens on the webmaster’s end by a long-shot.
In this article, we’ll be talking about what makes this plugin stand out. But before we begin, let’s talk about the difficulties associated with WordPress migrations. Only with that understanding can we fully appreciate the functionalities of Migrate Guru.
The “Hard Knocks” World of WordPress Migrations
A WordPress website is a network of databases and files that talk to each other. Only through that seamless communication can we expect a website to get delivered to our browsers.
Now, let’s talk about website hosting. You might be using a web host like Bluehost or SiteGround. For one reason or another, you get dissatisfied with the hosting service. In that scenario, you decide to shift services to, let’s say, HostGator. To implement this shift, you need to migrate your website to that host.
Sounds simple enough, but it’s easier said than done.
Webmasters face a variety of different problems during the process. Some of the most common migration errors include authorization mistakes, file errors, and database import issues.
Unless you’re experienced with WordPress, you’re going to have some trouble with migration. While there are a few hosting providers that offer free migration services, the majority of webmasters have to make-do and migrate websites by themselves.
Migrate Guru comes with tons of functionalities that simplify the migration process.
How Does It Differ from Other WordPress Migration Plugins?
Perhaps the best part about Migrate Guru is its one-step migration process. Running on BlogVault’s servers, it ensures that your live website isn’t overloaded.
The process is meant to facilitate heavy migrations, which means that even if you have a website of 200GB, you can migrate without a hitch. It will just take a bit longer.
Some of the prominent features of the plugin include:
- One-Click Migration – Just enter the credentials of your host and click on migrate. That’s it!
- No Site-Overload – Migrate Guru uses its own servers to perform the migration, thus freeing up your server resources.
- Built for Data-Heavy Websites – Traditionally, data-heavy sites couldn’t be migrated properly due to import limits. Migrate Guru helps migration of websites up to 200GB.
- No Add-Ons – The plugin is all that it is. There aren’t any associated add-ons that you have to download in order to make it work properly. The best part? It’s totally free.
- No Storage Space Required – During the migration process, a copy of your website is created on Migrate Guru’s servers. Once it’s finished, your website is removed from their servers. It doesn’t take up any of your server resources.
- Fully-Automated – Doing a search and replace, among other manual tasks, can be a complicated process. Migrate Guru automates the entire process, eliminating the need for human input.
- Timely Alerts – During the migration process, you receive timely email alerts with regards to the migration status.
Now that we’re finished discussing the features of the plugin, let’s start the migration process.
Step #1: Installation
First things first, you have to visit the plugin store and install Migrate Guru.
From your WordPress dashboard, navigate to Plugins > Add New. All you have to do is search for “Migrate Guru”, install, and then activate it.
Step #2: Finish the Migration Form
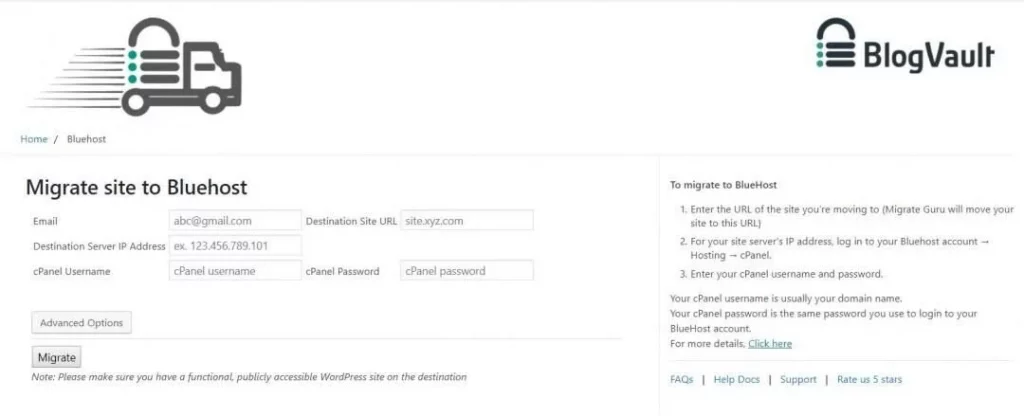
To get started with Migrate Guru, you need to fill out the migration form required to run the plugin. To be specific, you need to fill in the following details:
- Your email address to ensure you stay updated during the migration process.
- The URL of your site on which you’ve set up the domain name.
- The Destination Server IP Address where you’ve set up the web hosting account.
You can get the destination server IP address information from the cPanel. If your hosting provider uses its own customized cPanel, you need to ask them where you can find said information.
When you’ve logged in to your web host’s cPanel, you’ll ideally see the destination server IP address in the top left-hand bar. If you don’t see it, you can always contact the support of your web hosting provider to get that information.
Once you have all the information present, visit Migrate Guru again to set it up properly.

Advanced Options
This option should only be used by webmasters who have a “https://” instead of a “https://” source destination.
If you have a HTTPS source destination, it means that you’ve purchased an SSL certificate and you need to authenticate it. Ideally, you should never keep your website on HTTP since it poses a WordPress security risk and isn’t good for search engine rankings.
Once you’ve entered the details, it’s time to move on to the migration. You’ll see how a once complicated process can become simplified with Migrate Guru.
Note: If you get stuck during this step, it’s better to ask your hosting service for support instead of doing things yourself. Unless you’re a WordPress expert, it’s best to consult with customer support.
Step #3: The Migration Process
Click on Migrate to continue. Let’s see some magic happen!
The moment you begin the migration process, Migrate Guru will send an email notification informing you that the process has begun. With it, it also sends a link from where you can view the migration process.
Migrate Guru will redirect you to a screen showing the real-time process of your website migration. You’ll find a link to this page in the email notification. Use the progress bars to watch the migration progressing.
At this point, you don’t need to keep your browser window open. You can just as well get informed of the migration process through email.
The migration time will depend on how heavy your website is. It means that if your website is heavier, then it will take a much longer time than let’s say if your site is taking a gigabyte of data.
Once the entire process is successfully completed, Migrate Guru will send a message saying that it’s done so. Just click on the email link that redirects you to the now migrated website. That’s all there is to it!
Compared with other migration plugins, this process is a lot simpler. You don’t have to do anything manually. It’s similar to the migration services provided by a hosting provider, but different in that you can migrate to the hosting server of your choice.
The developers at Migrate Guru understand the importance of a quality-assured product. They’ve placed a lot of time and work into the product and it shines in the functionality provided by it.
Problems with The Migration
While Migrate Guru ensures that the migration process is seamless, you can run into some problems. Let’s troubleshoot two of the most common issues:
- Once you get an email link and you don’t see the migration progress screen then it could be because you’ve entered the wrong data.
- For new websites, Migrate Guru might take some time to connect to it.
For the first step, you have to repeat the process above. Only this time, type in the correct website information in the form. It will work if you have entered the correct data.
For the second one, all you have to do is wait. Once Migrate Guru fetches all your data, you’re good to go.
Conclusion
We’ve just finished a tiring migration process in just three simple steps.
Again, the migration process will take more time if your site is absolutely new. If the site is smaller, you can finish the migration process in minutes.
The best part? Since the migration process took place on BlogVault’s servers instead of your own, it took up even less time and resources. In addition to that, we’ve also managed to eliminate any possible chances of crashes or performance issues.
If you feel that you’re not up for the migration challenge yet, you can always contact a WordPress Developer to perform the migration for you.


Great article mate, very well explained in simple words. However I would like to add a few points; So WordPress is basically a creation tool that is used for the development of a website’s front end, and back end including the implementation of themes and plugins. WordPress developers design and implement websites for companies.