WordPress Multisite Network and How You Can Set It Up
The following post discusses the concept of WordPress Multisite.
An often-underrated concept, it’s highly effective for companies looking to expand and grow their websites on WordPress without having to go through individual domain names and WordPress installations.
So, let’s begin:
Table of Content
- What is a WordPress Multisite?
- Key Features of a WordPress Multisite
- Who Should Use a WordPress Multisite Network?
- Pros and Cons of WordPress Multisite
- WordPress Multisite Examples
- WordPress Multi-Site Set Up – The Pre-Requisites
- Adding a New Website to The WordPress Network
- Wrapping Up
What is a WordPress Multisite?
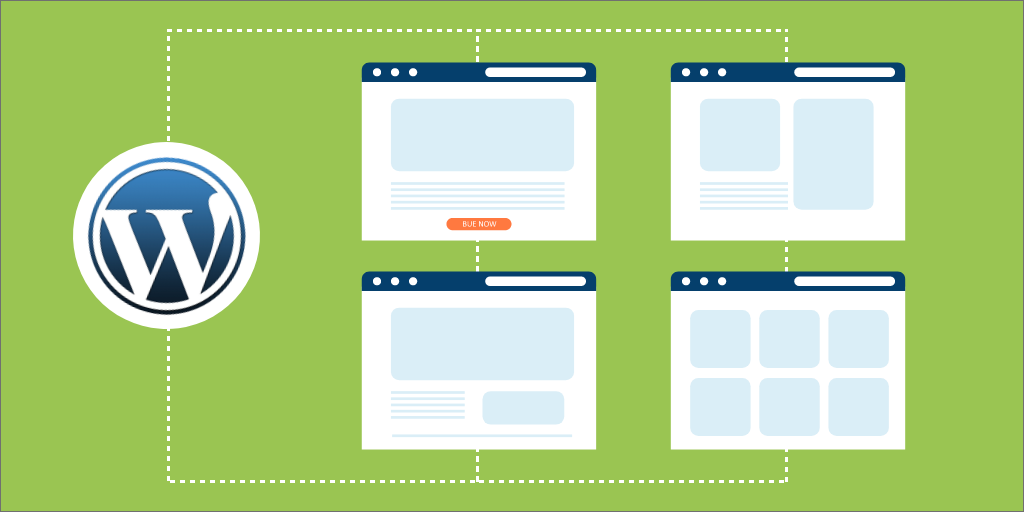
WordPress multi-site network is the process of running and managing multiple sites through a single WordPress installation.
This means that one WordPress dashboard becomes the main admin panel for multiple websites.
The super admin for a multi-site network has control over all the user roles, themes, plugins, and updates on the network.
Now, WordPress’ flexibility and scalability depends on the quality and space of website hosting. With the right hosting service, you can possibly host hundreds, even thousands of websites on the multi-site network.
Take WordPress itself as an example. It’s a multi-site network running an entire portion of the internet. The same goes for another CMS with the same name, WordPress.com: though it’s not as popular.
WordPress multi-site wasn’t always a thing. Since the platform updated to version 3.0 though, it’s become a major part of the WordPress ecosystem.
Key Features of a WordPress Multisite
There are many features that are exclusive to the WordPress multi-site ecosystem. Let’s look at these features in a bit more detail
- You can have multiple URL’s that can differ depending on the multi-site settings. The directories for “examplesite.com” can look like “entertainment.example.com” or even “example.com/john”.
- You can set roles and permissions for managing your multi-site network.
- You gain full control over the website in managing plugins, themes, and the core WordPress software.
While that’s effective in giving you control, it also means that you (or your team) are responsible for security, maintenance, and updates to plugins, themes, and the core WordPress software. With a big enough multi-site network, things can become rather unmanageable.
Who Should Use a WordPress Multisite Network?
If you’re a website owner without a multi-site system present, then it might be hard for you to wrap your head around the concept. Used by corporations, schools, universities, NGOs, and online businesses, it’s one of the best way businesses can expand themselves without facing management troubles.
While not a WordPress specific example, Amazon and its product AWS does this really well. It keeps its ecommerce store and its cloud computing platforms (two very different things) separated from one another while still keeping each other a part of the organization.
While it’s indeed a very different example, it goes to show how effective multi-site networks can be, regardless of whether they’re built on WordPress.
If you have multiple business units, say a B2C and B2B eCommerce store, running in the same WordPress ecommerce store, then it becomes hard to manage it.
With a multi-site network, you can make them two distinctive parts of your business operations.
But there are instances where using a WordPress multi-site system isn’t right. Backing up can be a huge problem if your multisite doesn’t originate from a principal domain.
This would mean that you would have to individually update everything on that site.
Pros and Cons of WordPress Multisite
Now that we have a basic understanding of WordPress multi-site, it’s time we move on to the more technical details.
This is a must-read for anyone who wants to start with WordPress multi-site.
Pros
- Manage multiple websites from a single dashboard. It makes business expansion easier and allows teams to work efficiently even if they’re in different business units.
- You can assign user roles, permissions, and administrators for each individual website.
- You can update WordPress core, themes, and plugins directly from the website.
- With a master installation, all your business data will be stored in one place.
Cons
- Because all the sub-websites are linked to a single principal domain, problems with the main website; like downtime, and network resource usage can cause issues with the sub-sites.
- Traffic increases on one website can affect the performance of other websites as well. This also applies to security issues, which can cause a domino effect for other websites in the network.
- Not all web hosts support a multi-site system for one reason or another. Speaking of hosts, you need a pretty solid hosting service to accommodate multi-site systems. You need to learn about web hosting before you start off with multi-site.
WordPress Multisite Examples
There are plenty examples of businesses and organizations who have set up WordPress multi-site for their parent website and subsidiaries. Let’s look at three of them in detail, shall we?
The University of British Columbia Blogs
The University of British Columbia (UBC) website uses WordPress multisite for the following purposes:
- Course websites
- Multiple author blogs
- Portfolio websites for teachers and students
- Discussion forums for university events
The New York Times Blogs
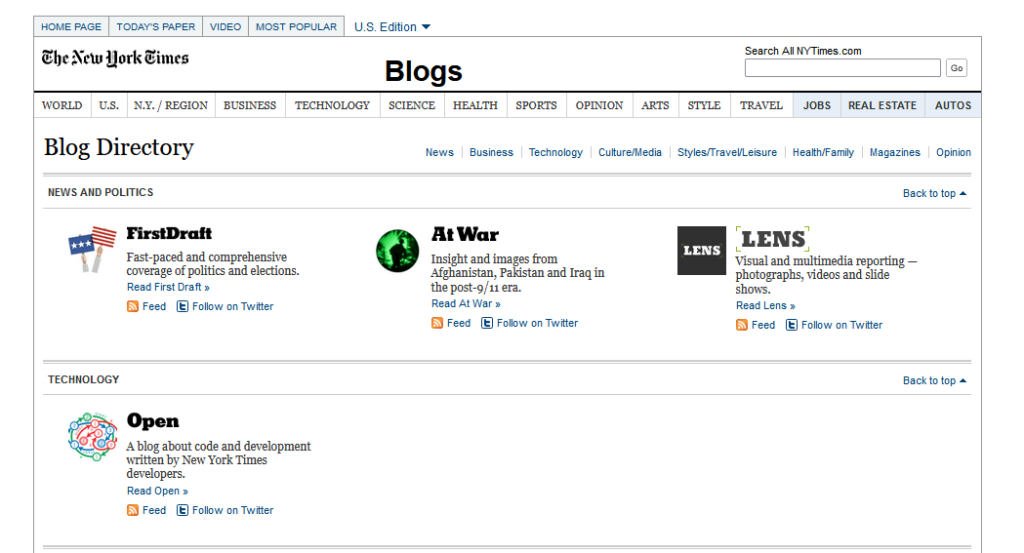
The journalistic giant, the New York Times, formerly used WordPress multi-site to manage a variety of different blogs covering a range of different topics.
Harvard Blogs
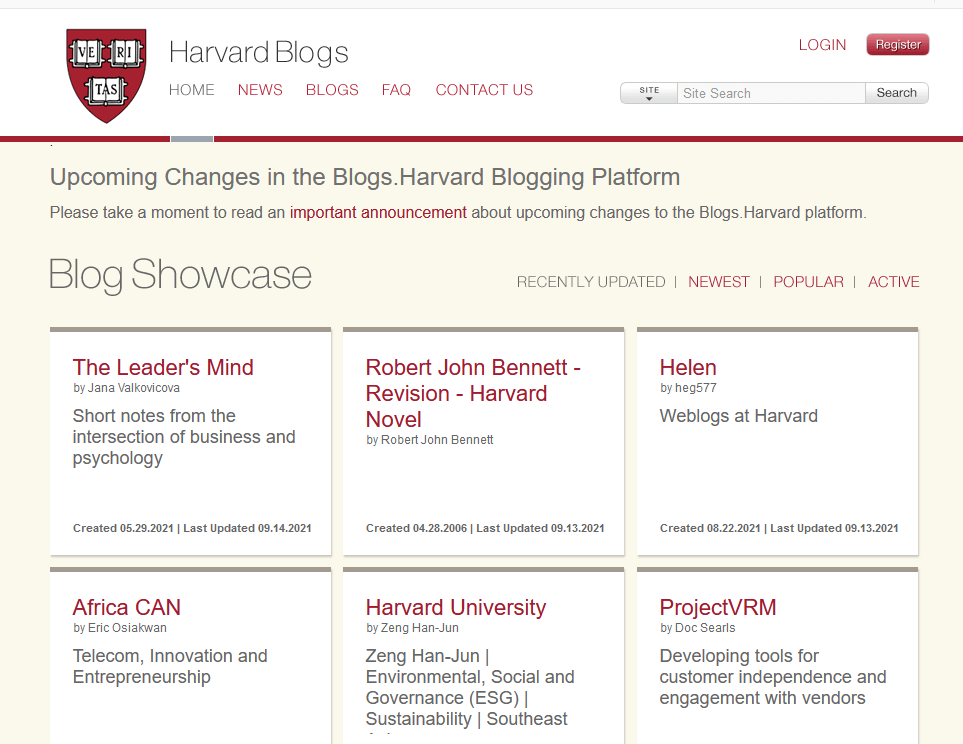
Harvard University uses WordPress multisite in the same manner as UBC.
The blogs cover a variety of topics ranging from university courses, the latest research, opinions, and general blogging.
WordPress Multi-Site Set Up – The Pre-Requisites
Before you begin the installation process for WordPress multi-site, you need to confirm the following:
- Do you have a primary WordPress installation with a domain name?
- Are you using the right permalinks? Some website owners use URLs like http://example.com/?p=2345 which can be problematic for SEO. You need to use pretty permalinks on your website instead.
- Have you deactivated all your plugins?
- Have you backed up your WordPress website before you’ve done multi-site?
- Do you have FTP access for your WordPress website?
Answering all these questions can help you avoid problems in the long run. If you do make an error, then you can always revert back to the original version of your installation because of the backup.
2. Enable WordPress Multisite in Wp-config.php
Follow along with the steps to enable multi-site on WordPress:
- Connect your WordPress website with an FTP like FileZilla.
- When you open up the FTP, you get access to your WordPress files.
- In the main directory, open up the wp-config.php inside a text editor like Sublime Text, Visual Studio, or Notepad++.
- When you’ve opened up the file, you’ll see a lot of code present. You just have to search for and navigate for the following statement:
/* that’s all, stop editing! Happy blogging. */
- Directly above it, you should paste or write the following code:
Define(‘wp_allow_multisite’, true);
This enables the multi-site feature on your WordPress site.
Save the file and exit from the text-editor.
Once this step is finished, you will have enabled WordPress multi-site. The next step is to install the network.
3. Install the WordPress Network
This one is comparatively easier.
Open up your browser, and log into your WordPress dashboard.
Under the tools section, you will have an option for network set up. Click on that to start setting up your WordPress multisite.
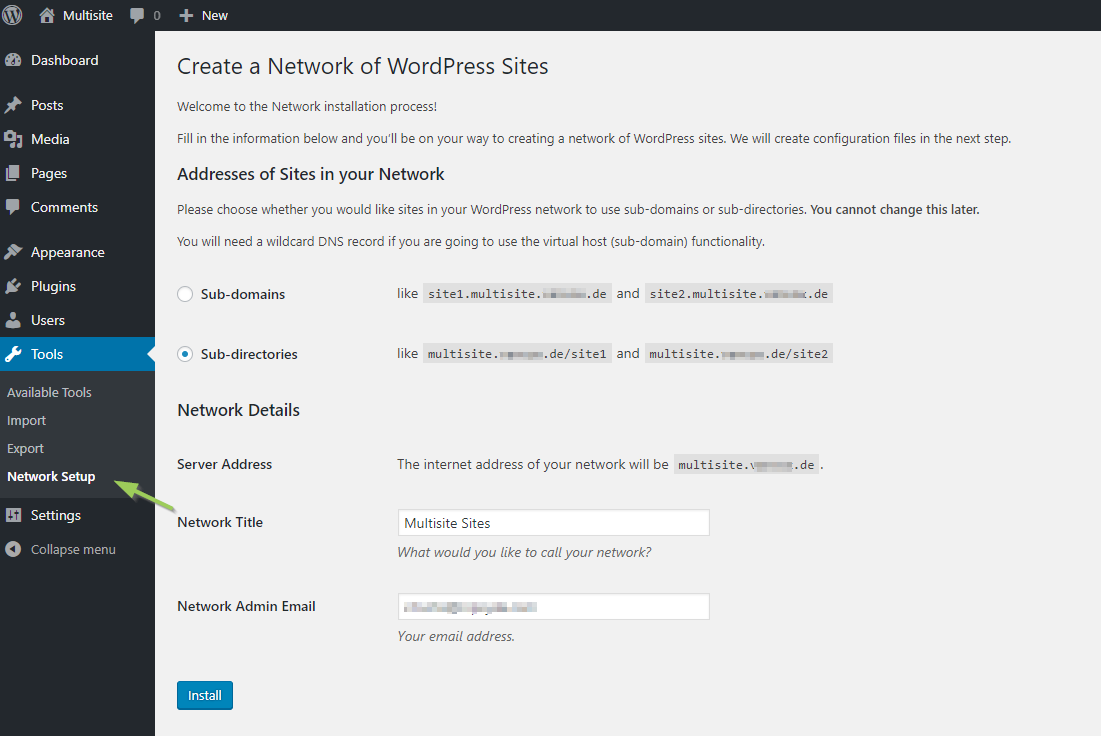
From there, you can decide whether to add sub-domains to your multi-site or separate them into different subfolders. For example, you can have a site URL that looks like “examplesite.com/entertainment” or “entertainment.examplesite.com”.
This is a one-time decision and reverting it back can prove harmful to your SEO. Make sure you have a good understanding about permalinks and SEO before you make the decision.
Under network details in the section Network Title, type in the name of your network.
Enter the email address for your network admin.
Click on install.
4. Add Multisite code to wp-config.php and .htaccess
Once you’ve finished the installation, you have to go back into the wp-config one las time. This time, WordPress will give you two snippets of code that you need to add to wp-config.php and .htaccess.
They’re both located in the root directory of your WordPress site.
In your wp-config.php file, find the line that reads:
/* that’s all, stop editing! Happy blogging. */
Directly below it, write or copy/paste the following code:
Define(‘multisite’, true);
Define(‘subdomain_install’, true);
Define(‘domain_current_site’, ‘my website’);
Define(‘path_current_site’, ‘/’);
Define(‘site_id_current_site’, 1);
Define(‘blog_id_current_site’, 1);
The next snippet you’ll have to add is in the .htaccess file.
Rewriteengine on
Rewritebase /
Rewriterule ^index\.php$ – [l]
# add a trailing slash to /wp-admin
Rewriterule ^([_0-9a-za-z-]+/)?wp-admin$ $1wp-admin/ [r=301,l]
Rewritecond %{request_filename} -f [or]
Rewritecond %{request_filename} -d
Rewriterule ^ – [l]
Rewriterule ^([_0-9a-za-z-]+/)?(wp-(content|admin|includes).*) $2 [l]
Rewriterule ^([_0-9a-za-z-]+/)?(.*\.php)$ $2 [l]
Rewriterule . Index.php [l]
Save both files and continue on to the next section.
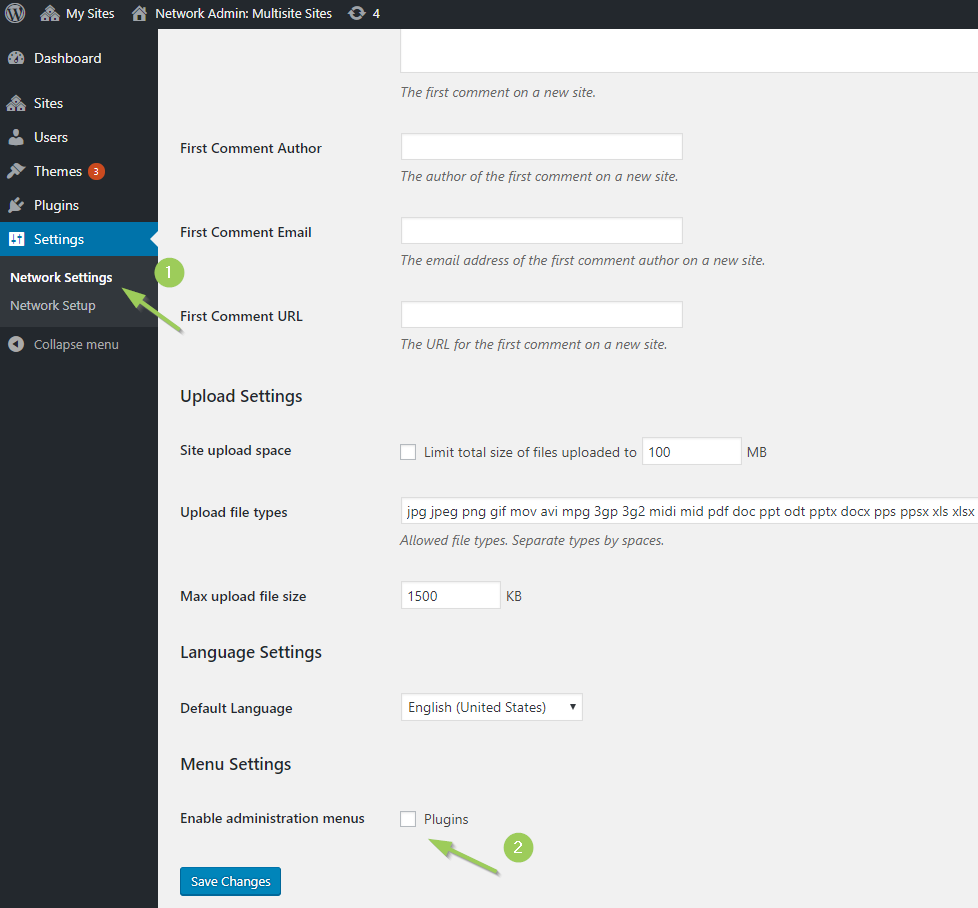
5. Menu network administration and the network settings
Once you’ve done the changes, you will see an option on the admin dashboard titled “Network Admin”.
There you will be able to manage all the multi-sites that are operating from the principle domain. This admin feature can be accessed regardless of the website that is being used.
In the network administration section, you will see a list of all the websites that you’ve added to the WordPress multi-site network. When you click on their names, you will see the backend of each site.
This is what network admin panel for WordPress multi-site looks like:

Here’s a step by step run-down of each of the sub-menus:
- Dashboard: Different from the main dashboard, this is the place where you get an overview of your various sites. Besides that, it allows you to add new users and new sites to your network.
- Sites: Going deeper, the sites tab is where you can view all the sites and their various performance metrics.
- Users: This section of the site has all the registered users on each website. You can add/remove/assign roles and permissions from here. Moreover, you can also assign a super admin, who is responsible for controlling all the sites within the network.
- Themes: The themes section is where you get to manage all the themes present with in your multi-site. You can make global or individual changes to the look and feel of each website.
- Plugin: Similar to themes, this section gives you control over the plugins working on your sites. You can activate/deactivate/delete or add plugins according to your requirements.
- Settings: In the settings tab, you have the option of editing the basic settings of your WordPress site. You can make changes to the name, admins, user registrations, and permission, set the language of your site, and more.
Adding a New Website to The WordPress Network
With only one principal website, your multi-site network won’t live up to its name. For a regular WordPress site, having one or two more websites will truly make it a multi-site network.
In this section, we’ll show how you can add more sites to your WordPress multi-site network. Just follow along with the steps and you’ll be good to go:
From within your WordPress dashboard, navigate to My Sites > Network Admin > Sites > Add New.

Enter the address of your multi-site. At this point, you can either add a subdirectory or a sub-domain.
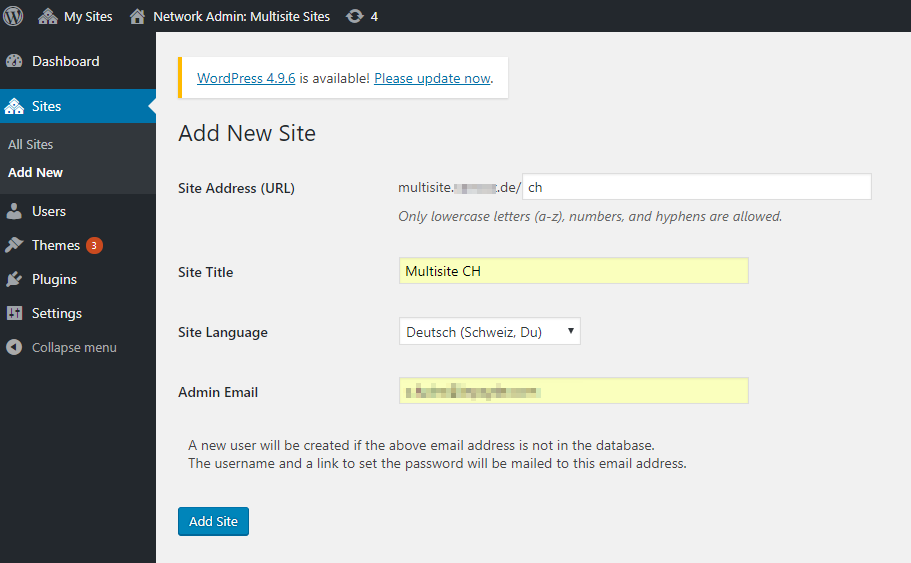
Here are some basic settings to properly enable WordPress multi-site:
- Give a nice title to your website. You can display it at several positions within your network.
- Select the language in which your WordPress multi-site will work.
- Select an email address where you will receive notifications related to your website’s performance. You can add your own email address or that of a super user.
Once you’ve done that, just click on the add site button. Your new website will be created and its name will be displayed in the following location:
My Sites > Network Admin > Sites
Installing Plugins and Themes in The WordPress Multisite
Within a WordPress multi-site, the person responsible for adding, removing, and maintaining the plugins is the super admin.
To find the plugin administration panel, you can navigate to network Admin > Plugins. For the themes section, you can navigate to network Admin > Themes.
Wrapping Up
From all that we’ve discussed in this post, it should be clear that WordPress multisite comes with various advantages.
Without having to constantly log in and log out of your various websites, WordPress multi-site gives you legroom, and freedom to manage your WordPress sites from a single dashboard.
Hopefully with this, you’ll be able to manage your WordPress website accordingly and effectively.

Fahad Sheikh
Fahad leads Codup on the marketing, growth, and product fronts. With over 12 years of experience in the tech and marketing industries, he likes to share his experiences and learnings with everyone. Fahad likes to read books, spend quality time with his family, and play and watch football.