How to Build a WordPress Site from Scratch?
This post will guide you how to build a WordPress site even if you have no prior WordPress or coding experience. You can do it!
Looking to create a website, but things seem too technical?
Don’t fret. It’s a common symptom for people who are beginning in the digital world.
To put you at ease, we’re just going to say this: it’s very easy to create a website.
Yes, with the right guidance and tools available, you can create a website that is not only aesthetically designed, but also functional enough to help you stand on your own against the giants of the digital world.
Now, you might be wondering;
Why don’t I hire a website developer and get my site developed?
Well, not everyone has the financial resources to hire an expert. The startups and small businesses have to make-do and develop their websites by themselves.
Nothing, and we mean every letter of that word, has proven more crucial in creating sites other than WordPress.
The CMS extraordinaire, WordPress, dominates the market with a whopping 34% hegemony while its competitors are reduced to measly single-digit percentages.
With WordPress, you can build a website for just about anything. Want to create a B2B blog? An eCommerce store, maybe? How about an entertainment publication? WordPress and its massive potential has got you covered!
Why should you use WordPress?
Even with competitors trying their hardest to get the upper hand, there is no replacing WordPress. There are plenty of reasons why WordPress is the best CMS to build your site. To list a few:
- WordPress is free to download, install, and use,
- Once you’ve set things up, it’s easily customizable,
- It’s built keeping modern Search Engine Optimization (SEO) standards in mind,
- It’s easy to manage content with the platform,
- It has support for all sorts of media types,
…among other prominent factors. If you want to create a website easily, WordPress is the first choice.
Do I need programming knowledge to create with WordPress?
At the very basic level, absolutely not. WordPress is popular because of its user-friendliness, which is primarily attributed to its lack of coding requirements.
To elaborate, if you’re starting with a WordPress website, you don’t need any coding knowledge. The UI is easy to use, and you can install themes and plugins on the fly. If you’re feeling creative and want to customize your site’s layout even further, then there you have both built-in, and third-party drag-and-drop customizers at the ready.
What is this guide about, and how to make the best of it?
In this guide, we’ll be showing how you can create your own website with WordPress. We’ll be discussing everything: from selecting the best domain name to creating a highly functional website.
If you want to skip ahead to any part, feel free to use the table of contents mentioned:
That said, here’s how you can get started with WordPress.
Pre-Launch Basics: The Must-Haves You Need to Know
Before you start installing WordPress and customizing it, you need to get yourself acquainted with some basics.
To run any WordPress website, you need to have the following:
- A domain name
- A web hosting service
What’s the difference between the two? Let’s find out.
What is a domain name?
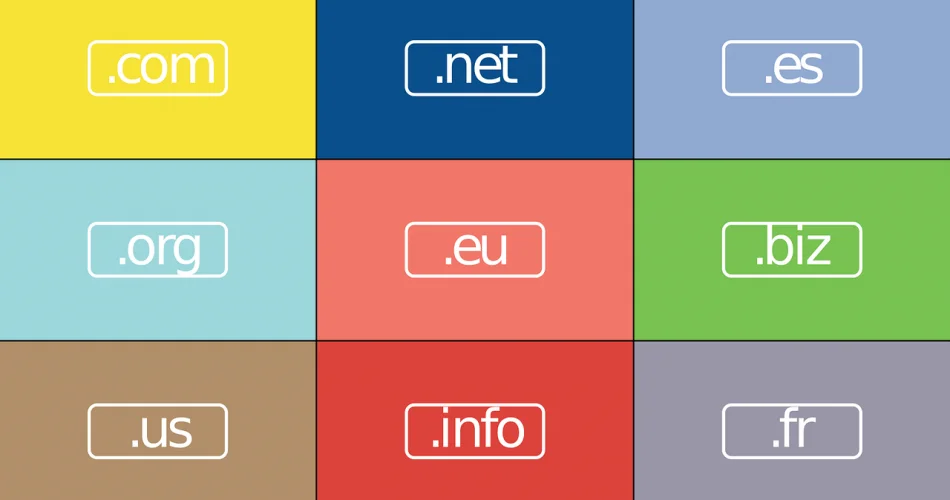
The name of a website; ending with a .com, .io, .gov, . org, and more, in a nutshell, are domain names.
It’s the address people type in their browser to access your website. Take the context of a house. A domain name, at its core, is the address of your house.
Let’s elaborate on this:
The internet is a complex global network of computers connected through transnational cables. These cables let people from all over the world communicate with one another.
Now there are so many connections and so many computers connected. For identification, each computer is assigned a specific IP address. This is what a basic IP address looks like:
192.168.1.1
With so many IP address numbers, it becomes hard to remember each IP address. Just imagine if you had to visit your favorite social media website through an IP number.
Domain names were invented to make the identification easier.
You don’t have to remember a long string of numbers for your favorite website. All you have to do is type the website’s name, and you can access them easily.
Another part of a domain name is the domain name extension. Remember when we talked about the “.com” above? Well, that is the domain name extension.
What kind of domain name should I purchase?
There are plenty of domain name providers, and a wide variety of domain names available online. On top of that, there are plenty of domain name extensions for you to use.
Depending on what you want to achieve, you can purchase either a cheap domain name or an expensive one. Just make sure that your domain name is related to your business or blog.
For example, if you’re blogging about Hollywood actors, you need to develop a domain name that’s accurate with the niche. You may or may not find the right domain name, but there are always variations that you can try out.
As a starter, you can try out a domain name generator to find a domain name for your website.
Now that you know the bare-bones essentials of domain names, it’s time we move on to discussing web hosting.
Web Hosting:
What is Web Hosting?
At its core, a web hosting service allows you a room where your site gets to live. If the domain name was the address, then the web host is the house in which your website lives.
Web hosting providers like Bluehost and SiteGround are in the business of providing you with web server space spanning data centers across the world. Your website is stored, hosted, and delivered to users from the data center to the user when they enter your site’s URL into the browser.
To get started with web hosting, you would ideally want a domain name. These hosting providers ask you to enter the domain name. Many even go so far as to provide you with a domain name if you don’t have one.
Features to look for in a hosting provider
With a hosting provider, this is what you should ideally be looking for:
- Email accounts – It allows you to create professional email IDs like contact@yourdomain.com or feedback@yourdomain.com. This comes in really handy when you’re reaching out to prospective clients or businesses.
- FTP – File Transfer Protocol (FTP) allows you to upload directly from your computer onto the server. If you’ve built a website by yourself, this can prove really beneficial.
- WordPress Support – Many have this feature, while some don’t. Whichever hosting provider you select, make sure that it allows you to create or upload a website built with WordPress.
While these are genuinely must-have tools, we cannot emphasize the importance of having adequate storage space, resources, server uptime, privacy, and security.
That being said, there are different types of web hosting services, each differentiating in their services’ strength. Let’s take a quick look at them.
What are the different types of web hosts?
The options for choosing a web host are pretty much endless. But which one is the best for you? It’s a question we’ve faced time and time again.
Well, it depends! To fully understand this answer, let’s look at the various hosting services and their users.
1. Shared hosting
This hosting is best for beginners. It’s kind of like a shared living where your website resides along with other websites. With shared hosting, every website on your server shares the same space and utilizes the same resources (RAM, CPU, etc.).
Similar to shared living spaces in real life, shared hosting costs are low. They also provide entry-level webmasters a good overview of how the world of hosting works. However, in the long run, when you’ve got scaling concerns, you’ll definitely want to invest in a hosting service with a little bit more room.
This is where VPS hosting comes into play.
2. Virtual private server (VPS) hosting
If you don’t want to commit to a dedicated server, VPS is your best choice. It’s the middle-ground that offers a space for individuals to gain more control over their website’s backend.
In real-world terms, it’s akin to a rented home. You’re dealing with maintaining the home yourself, but the landlord has an ultimate say. Even so, it’s better than living in a cramped apartment, but at this point, you don’t want to invest in a house.
It costs a bit more, but overall, it provides website owners with a lot more space to grow. However, VPS allows you to “grow” but not scale.
It’s far better than shared hosting but not as good as a dedicated host in terms of handling traffic levels and spikes.
3. Dedicated server hosting
This form of hosting gives users the most control. The server is entirely yours, and you manage all the functionalities – from the root to security, privacy, and general administration – associated with it.
But all of that comes at a cost.
Since this service is similar to owning a home, the costs are indeed expensive. When you’re getting so many functionalities, the costs are bound to be a lot more.
4. Cloud hosting
This is currently trending and for the right reasons. In terms of hosting, it consists of a network of computers working together on the cloud to deliver computing resources. It allows users to consume computing resources.
Cloud hosting is definitely a lot more scalable compared to a dedicated resource. The more your site grows, the more you can upgrade your resources since the business model, in general, is based on payment on requirements.
5. Managed hosting
Managed hosting, to put it simply, is an advanced version of dedicated hosting. The company provides you all the technical services and basically “manages” your website’s operations.
With a managed hosting service, you don’t have to worry about updating your software and hardware – the company takes care of everything.
It’s kind of like living in a high-end apartment. Not only do you own the house, but you also get value-added services courtesy of the owners of the apartment complex.
But at the end of the day, a managed host, with all its virtues, also means more costs. Unless you’re an advanced user looking to scale and grow your business, you don’t have to invest in managed hosting.
Now, server location is an important issue when selecting a host. The closer the website’s location, the better it’s delivered to the end-user when they select a website. This practice is called colocation, and you can rent a colocation server closer to home if you require more bandwidth for your website.
Now, which web hosting would suit you best? Well, it depends on what you want to achieve with your website and your skill level. Either way, we would recommend you begin with the shared or VPS hosting since the risk level is less, and you can get a handle on things.
Getting Started with WordPress
Once you’ve purchased a web hosting service, you’ll get access to the cPanel. A cPanel (aka Control Panel) is the backend of your site where you’ll create email addresses, install WordPress, and check your site’s s, among other things.
Now, we won’t elaborate on the entire anatomy of a cPanel dashboard. At this point, we want to install WordPress.
In the next section, we’ll install WordPress using the Bluehost hosting service, and it’s an intuitive WordPress installer.
Telling Bluehost to Install WordPress for you
After you’ve completed the sign-up process with Bluehost, you’ll receive an email that gives you credentials you can use to sign-in to your Bluehost cPanel.
The moment you complete the sign-up process, Bluehost will display an option for launching an installation wizard from which you can install WordPress.
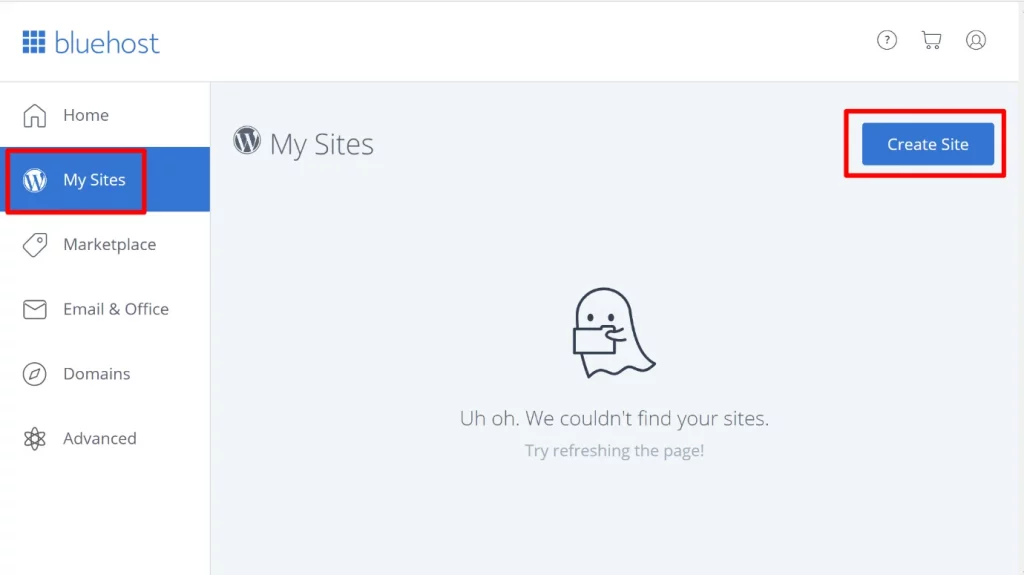
If you don’t see it, you can install it alternatively by navigating Bluehost’s My Sites section and selecting Create Site:
During the installation process, all you have to do is set the credentials for your WordPress. That’s about it! Once the wizard finishes, your WordPress site is installed, and you’re ready to begin your WordPress journey.
Get familiar with the WordPress UI.
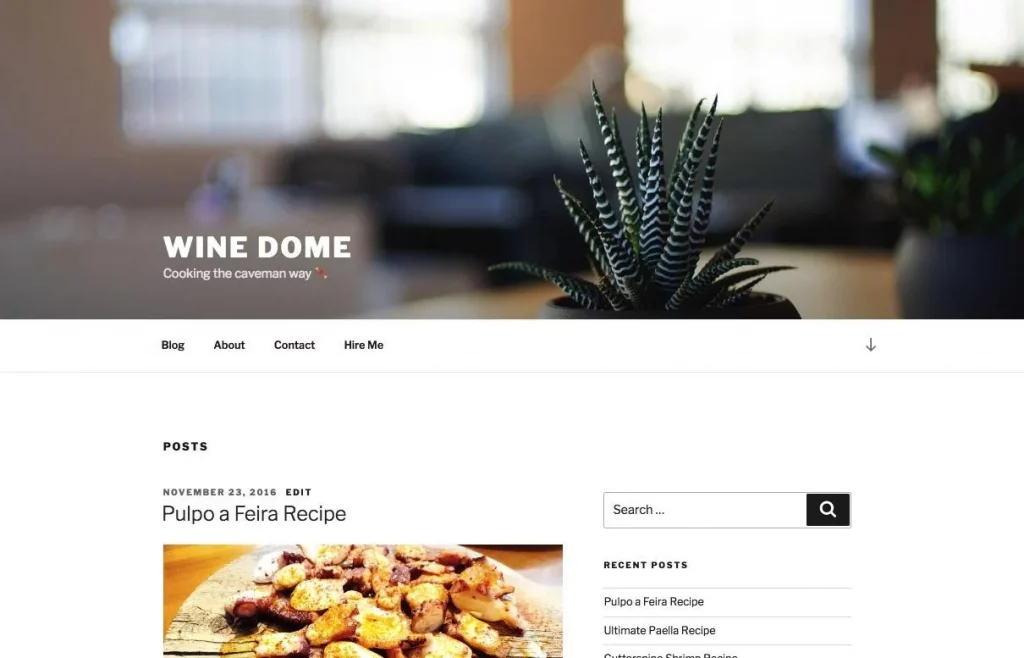
You can access your fledgling WordPress website through typing in www.yourdomain.com/wp-admin on your browser and pressing enter.
Once you do that, the following page loads up:
Log-in to WordPress using the credentials you’ve set in the Bluehost installation wizard. Once you’ve logged-in successfully, you can see the WordPress dashboard in all its majesty.
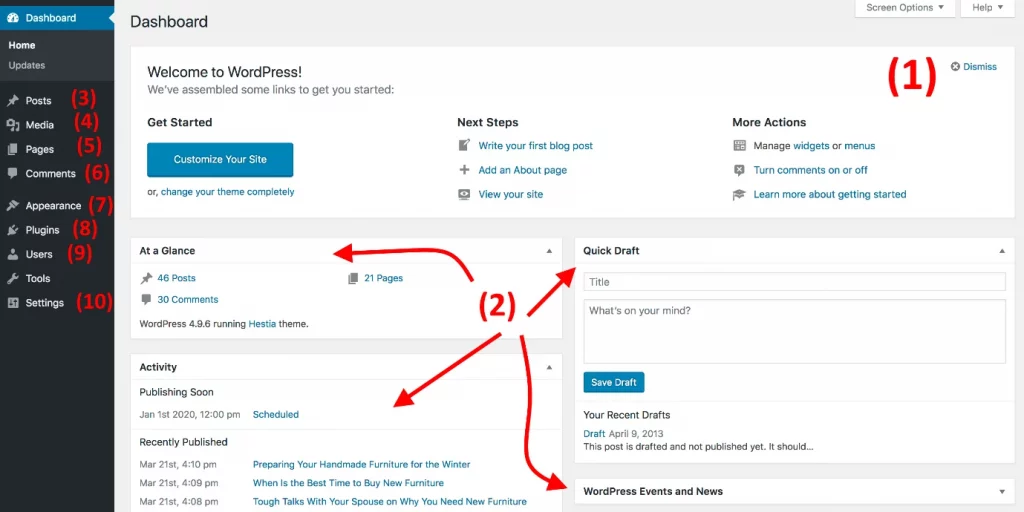
Legend:
- Welcome message displaying you quick links to the admin panel of your website.
- The present status of your website. Down the road, you will see more data if you have plugins like WordFence or Monster Insights.
- The Posts section where you will create blog posts.
- The Media section lets you upload and manage images and other media items on your site.
- The Pages section lets you create sub-pages (i.e., About, Shop, and Portfolio pages).
- The comments section is where you can manage comments on your site.
- The Appearance section allows you to edit your WordPress site.
- The Plugins section allows you to install new plugins and extensions on your site.
- The Users section allows you to manage users on your WordPress site.
- The Settings section allows you to personalize a variety of different WordPress settings.
Now that you’re aware of WordPress’s default settings, it’s time we edit it to personalize the user experience further.
a) Set permalinks
Permalinks constitute the main structure of your website. Among permalinks, the URL structure is the most important, and you need to optimize it properly. For example, your Portfolio section should be abcmydomain.com/portfolio – making it look more professional and keyword optimized in the process.
To set a proper URL structure within your site, visit Settings > Permalinks from the WordPress dashboard. From there, check on the following setting.
b) Making your site public
Next, you need to ensure that search engines index your site. To do that, you need to enable search engine indexing.
Visit Settings > Reading and uncheck the “Discourage search engines from indexing this site.”

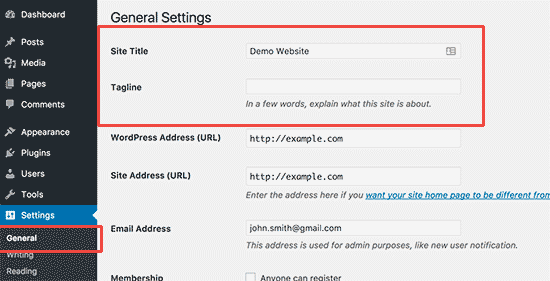
c) Set your website title and tagline
To set your website’s title and its associated tagline, navigate to Settings > General from your WordPress dashboard.
From there, you can set the title and tagline to anything that you want.
Having a site title and tagline helps give search engines context on what your site is all about. Moreover, it appears in different locations on your website, so it’s important to have it in place. That said, a tagline is not necessarily a “must-have,” but it is indeed a “nice-to-have.”
d) Allow or disable comments
Disable or enable comments? Well, it’s entirely up to you.
Yes, comments are an amazing way of engaging your site audience. The flipside to this is you have to deal with a lot of spamming and troll comments. While spam can be moderated these days easily, you can run into serious problems with troll comments.
If you want to disable or enable comments, you can do so through going to Settings > Discussion.

f) Set your time zone
Setting the time zone correctly can make publishing posts and pages a lot more organized.
Ideally, you should set up the time zone, depending on whether your target audience is located. Either way, you can set the time zone by navigating to Settings > General and setting the time zone accordingly.
With the basics out of the way, it’s time we move on the things that make WordPress what it is:
You can customize and organize it according to your own preferences. In the next section, we’ll show just how you can do that.
WordPress Theme
Themes are an essential aspect of the WordPress experience. They give your WordPress site the aesthetic appeal and design that’s representative of modern websites.
WordPress comes equipped with a wide variety of themes. Not only can you get those themes from the official WordPress theme directory, but there are also plenty of 3rd party premium theme providers.
This section of the guide is aimed at giving you the entire four-one-one on what kind of theme you should select.
Once you’re done with this section, you’ll be well on your way to selecting and customizing your theme according to your own brand’s voice.
Golden Rules When Picking A Theme
When you go head-first into selecting a theme, it’s unnerving. Which one should you pick? Which one will look the best on your website?
These are all valid questions and require significant foresight before you start acting on them. When selecting a theme, you should always consider the following factors:
- Simplicity:
Simplicity pays off! You don’t have to pick the fanciest theme out there. Look for a simple theme, and don’t take too much of a burden on your resources.
- Responsiveness:
This one’s a given. While most modern themes are responsive, some don’t have it or break in different device orientations. Make sure it’s compatible with all mobile devices.
- Plugin Compatible:
You should never select a theme that’s incompatible with your installed plugins. If you’ve developed your website on a localhost, you can test the theme on whether it is compatible with your installed plugins. If not, you can check the reviews of the theme to confirm if any incompatibilities exist.
- Ecommerce Readiness:
If you’re planning to run an eCommerce store, you need to ascertain whether your choice of theme is compatible with your eCommerce store. Failure to confirm this can result in drawbacks down the road.
- Multi-Language Support:
If you’re running a website in a language other than English, or have a multilingual reader base, you should ideally look at a theme that supports those operations.
- SEO-Friendly:
No amount of marketing can result in better rankings unless the theme is built to be SEO friendly from the outset. For better rankings, try to ensure you have an SEO friendly theme.
- Customizations:
The best part about a WordPress theme is that it can be customized depending on users’ preferences. Bear in mind that a complex website is hard to customize, whereas the process is easier with a simple theme.
- Ratings and Reviews:
Lastly, it would help if you focused on whether a theme has good reviews and ratings available. For this, you need to look a bit deeper at both the positive and negative reviews. This helps you make the right decision when it comes to deciding on a theme.
At the beginning of this section, we talked about 3rd party themes. Let’s analyze this concept a bit further.
On Premium Themes:
As the name suggests, these themes add serious value to your website. They are designed perfectly, and they also have a variety of tools available that make the WordPress experience better.
For example, Be Theme by MuffinGroup not only provides you with the Muffin Page Builder but also allows you to integrate Google Analytics code to your site without using an external plugin.
The upside to these kinds of the theme is that they allow you a boatload of features beneficial to your website. The downside? They’re paid.
So, if you have the budget for your new WordPress site, you should ideally look for a premium WordPress theme.
Read: Free vs Premium WordPress Themes
Selecting a Theme
Now that we know the best practices and the concept of premium themes, we need to get our hands dirty and actually select a theme.
You will find a variety of WordPress themes on the official platform.
On top of that, there are plenty of premium themes from third-party suppliers that you can use on your site.
Go on to select the theme that keeps all the best practices in mind.
Warning: An essential aspect of WordPress security is to update your themes constantly. Because of this, it’s always beneficial to update your theme files when it’s time. As a safety measure, don’t install nulled or pirated themes; they pose a serious security risk to your website operations.
Customizations
The final stage of this section focuses on customization. WordPress prides itself on the level of customizations it provides its users. Due to this, it provides its users with website customization tools.
You can now use plugins like Elementor, Beaver Builder, and if you’re using a premium WordPress theme like the Be Theme, you can use Muffin Builder.
Now, we won’t go into actually explaining how you can customize your theme with these plugins, but it’s important to note that they exist.
There are plenty of resources that can help you figure out Elementor and the others without knowing a single line of code.
Besides page builders, you can customize your website even further through customizations and tweaks.
WordPress Customization
Before you begin, make sure you have some content ready and published. If you have a dedicated content plan you wish to implement after the startup process; you can use just some dummy text for your content.
Once you’ve done that, you need to create a static page.
Static Page Creation Process
From your WordPress dashboard, navigate to Settings > Reading. There, you will see a couple of options for “Front page displays” and select “A static page.”
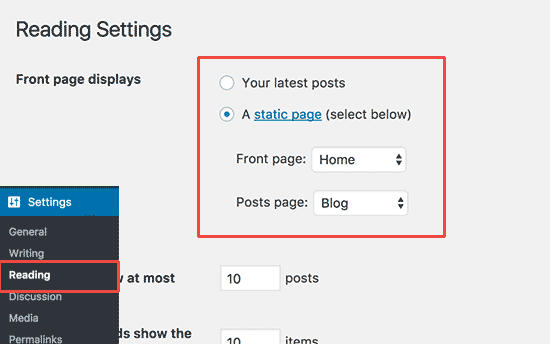
Now, click on “Save Changes.” With this, WordPress will display the Home page as your site’s front page and Blog page to display your blog posts.
Change Site Title and Tagline
When you’re installing your WordPress website, you get the option of choosing the title of your site. By default, it says, “Just another WordPress website.”
By going to Settings > General, you can change the title of your website.
You can change the name of your website. In our case, we can write Codup. Having a tagline isn’t mandatory since you can even leave it blank if you wish to. It’s one of those “nice-to-haves” of WordPress.
Click on the Save Changes button to store your settings.
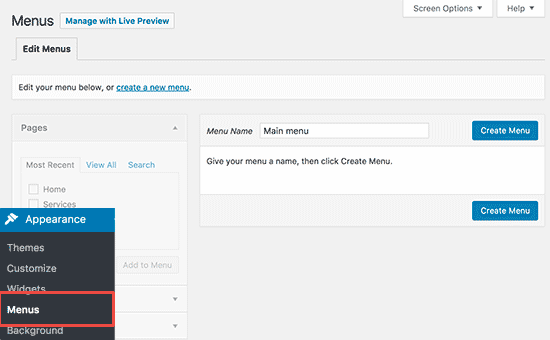
Create Navigation Menus
Having a nav menu is crucial. WordPress allows you to create a powerful navigation menu on your website with dropdowns and sub dropdowns.
By default, WordPress doesn’t provide this facility. You have to create it by yourself.
Go to Appearance > Menus. Name your navigation menu and click on the create menu button.
Now, you’ve created a menu, but it won’t show up on your blog. For that, you need to click on the add to menu button.
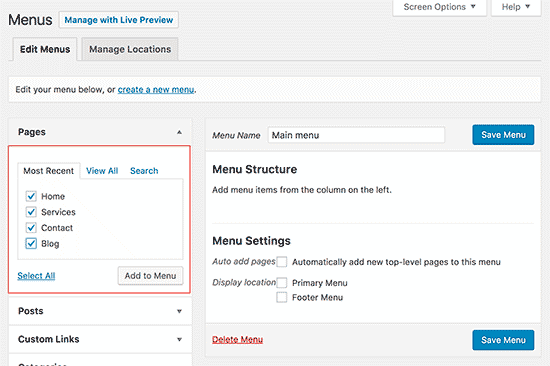
You need to move the menu items up and down now to rearrange their position.

Once you’ve done that, you need to select where to display your menu. Your WordPress theme will identify the menu and keep it on top.
Click on save and refresh your homepage. If your theme does support your menu (which 9 times out of 10, it will), it will display a homepage with the navigation menu.
Useful WordPress Plugins
Now that we’ve covered basically every step in the WordPress process, it’s time we move on to plugins.
An essential part of the WordPress experience, plugins allow you to add extra functionalities that weren’t already present on WordPress. This could include SEO, contact forms, and photo display functionalities.
WordPress’s official plugin store hosts thousands of free plugins that you can use. Also, there are plenty of paid plugins, as well.
Now, these plugins perform a variety of different functionalities. As a beginner, you need to select only a few essential WordPress plugins. These plugins can help add serious value to your website operations and make the WordPress experience better.
The following are some of the essential WordPress plugins you can download:
- WPForms
- MonsterInsights
- Yoast SEO
- OptinMonster
- WordFence
- WP Rocket
- BackWPup
- Elementor
- WP Super Cache
While there are plenty of others, these essentials will suffice for now.
Read: Best Free Cache Plugins for WordPress
Conclusion:
At the end of this article, we would say that WordPress mastery lies in practice. The more practice you gain, the more experienced you become.
We hope you enjoyed our ultimate guide for creating a WordPress site from scratch.
Need help? Contact us for professional WordPress development services.
Read Also
- How to Fix The Error Establishing Database Connection on WordPress
- How to Fix the WordPress Updating Failed and Publishing Failed Errors
- How to Get Rid of The WordPress White Screen of Death (WSoD)
- How to Duplicate A Page in WordPress?
- How to Completely Disable Comments in WordPress
- Wix vs WordPress
- Squarespace vs WordPress
- Weebly vs WordPress
- WordPress Keyboard Shortcuts Guide
- How To Edit Footer In WordPress